How you interface is dependant on what sort of controller you want and what you want to use it with.
I concern myself with arcade sticks only, so if you are looking tomake some sort of pads, then much of my advice doesn't apply.
In regards to the I-Pac, I would choose that or a similar USB interfacing device becase it will let me set what is what. Like Hotrods and X-Arcades, I want my input being fed as keyboard emulation, and that's wat the I-Pac does.
If I were to use one, and I will, eventually, I would set the I-Pac to input the same keys as the Hotrod, meaning that in most any Emu I only have to set the Hotrod config as default and the software will configure my controller for me. It's nice for Mame or Kawaks to know on a per game basis wether to use a Capcom six or SNK four layout for instance.
If you wire a USB pad the same way I wire a Playstation pad, then all you have is generic game device input, which must be configured manually, and uniquely for every Emu and usually every game.
Another point is that I have seen some Emus have trouble reading quick input from joysticks. The biggest offender in my experience is Kawaks, which has big problems reading correctly from a PSX-to-USB converter; my quarter circle input is reduced to chance. I've tried different brands of converters with the same results while my X-Arcade never misses. Or course, I use Kawaks more than any other Emu so it's a bigger deal for me.
As far as a wiring guide, every PCB is different so you have to learn how to read a PCB, This comes down to finding the point where the input physically happens (where the curcuit is closed) and figuring out how to hijack the circuit. Lesson one is how to tell the signal from the ground. Most PCBs are dark green with the trace in lighter green. A PSX pad, for instance has two black contacts on board per button, which are bridged when the button is depressed. The contact that leads to a large mass of lighter green is the ground. You can follow that trace to every input point on the board while the unique signal trace leads back to the encoder chip and terminates. Signals cannot touch each other, or you get a short.
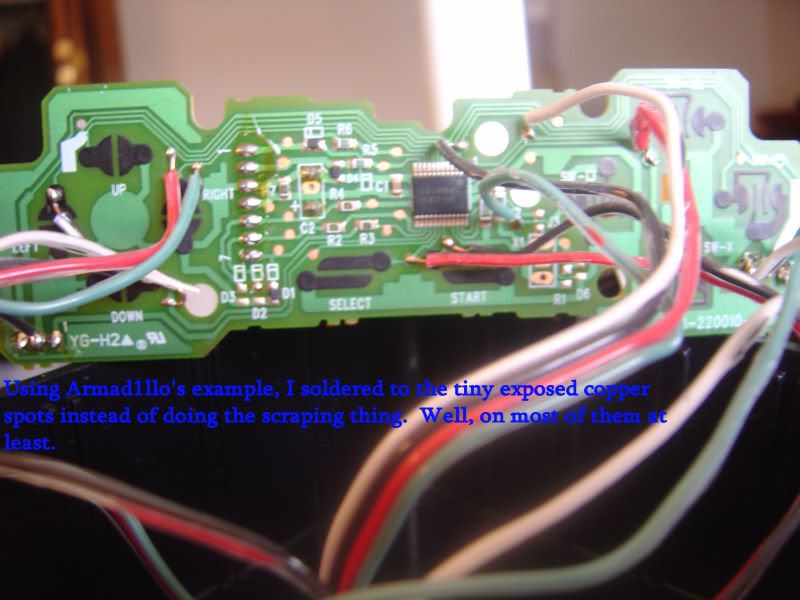
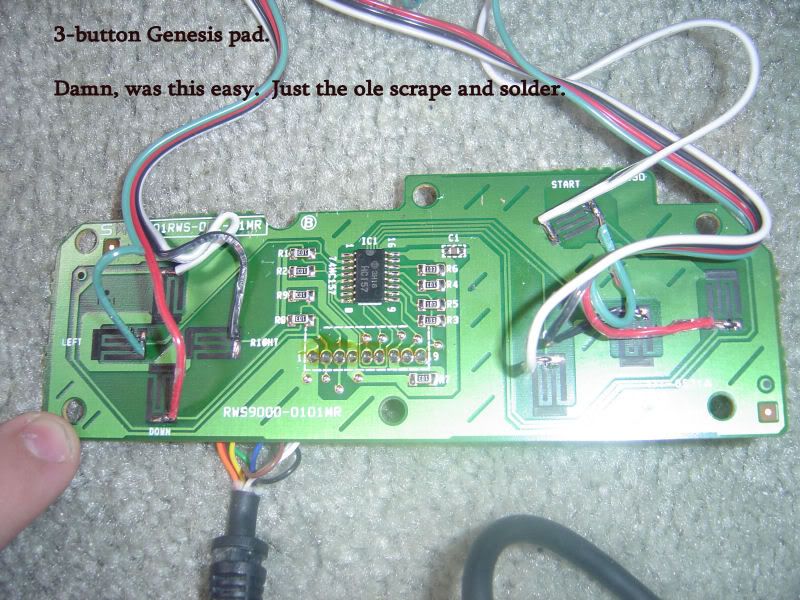
The easiest pads to "hack" are those in which the black contact can be scraped off to reveal copper, to which solder will adhere. You merely scrape off every signal contact and solder a wire from there to your microswitch, and one ground that you can share over your whole controller. Sometimes you can find small bits of copper stuck in the signals traces. You can solder to these points as well.
Also, if you were King Flux, you could just solder to the individual pins on the encoder chip, but it would be very, very tight. I used this method over the weekend for the start button on a Saturn pad and I was amazed that I pulled it off without touching the other pins.
The I-Pac won't require any of these hijack methods, BTW. It's made for wires to be hooked up to it.
Before I started doing any of this, I read
J&D's Arcade Controls over and over again and used them as a reference until I had done everything they cover myself. They aren't very detailed but given what I've already explained, they demonstrate some practical examples.
Here's some pads I've done recently. Note how I used the copper spots in the traces in the first example and scraped away the black contact in the second. When you can find my grounds in those pics, you can read PCBs.