• Hey, guest user. Hope you're enjoying NeoGAF! Have you considered registering for an account? Come join us and add your take to the daily discourse.

BBQ GAF - Smokin' Your Meat, USA Style

zbarron

Member
Would be an Oven the better choice then ?
Can ribs on the other hand be done on it ?
You could cook both pulled pork and ribs in your oven. They just won't be smoked.

Do you have the Weber Q 1200 or the Weber Q 2200? They are different sizes. In this link a guy smokes on the older model of the 2200.
http://www.racksofruin.com/post/2701138111/smoking-weberq-gas-grill
Note that he had to buy a metal smoker box and a rack to raise the meat further from the heat.

Here is an example of smoking on the Weber Charcoal Kettle.
weber_2_zone6hlwz.jpg

Note how far the meat is from the heat source.

this is the best thing about smoking meat for me. For a 8 or 9lb pork butt i literally use it for like 2+ weeks. One time i counted how many "meals" it provided for my wife and i, it was close to 30 meals between using it on potatoes, eating it by itself etc. 30 meals when the butt cost 10 bucks (when on sale) is a pretty damn good cost per meal.
Oh snap I forgot about pulled pork baked potatoes. Those are a perfect self containted meal.

Edit:nin1000 I thought you meant the internal of the grill but I now see you meant the internal of the meat. You can find a pocket thermometer for a couple bucks but there are better ways to test both pork butts and ribs for doneness.
 

nin1000

Banned
You could cook both pulled pork and ribs in your oven. They just won't be smoked.

Do you have the Weber Q 1200 or the Weber Q 2200? They are different sizes. In this link a guy smokes on the older model of the 2200.
http://www.racksofruin.com/post/2701138111/smoking-weberq-gas-grill
Note that he had to buy a metal smoker box and a rack to raise the meat further from the heat.

Here is an example of smoking on the Weber Charcoal Kettle.
weber_2_zone6hlwz.jpg

Note how far the meat is from the heat source.


Oh snap I forgot about pulled pork baked potatoes. Those are a perfect self containted meal.

Edit:nin1000 I thought you meant the internal of the grill but I now see you meant the internal of the meat. You can find a pocket thermometer for a couple bucks but there are better ways to test both pork butts and ribs for doneness.

Oh ok thanks.

Any suggestions on how to pulled pork and or ribs without smoking them ?
 

captive

Joe Six-Pack: posting for the common man
Oh ok thanks.

Any suggestions on how to pulled pork and or ribs without smoking them ?

in the oven or for the pulled pork a crock pot. Low and slow, same concept as doing them on a charcoal grill.

Before i had a smoker i used to make ribs in the oven. I would use one of those sheet pans that has a top thats perforated, i would put water in the bottom and the ribs on top. 225 for a couple of hours and then put them in foil for an hour at 300 or so, then take them out and put some BBQ sauce on them and back in the oven for 15 minutes or so. They would be super tender, only missing the smoke flavor, despite putting in liquid smoke in the bbq sauce.

There's a number of websites that have oven based rib recipes as well.
 

zbarron

Member
Oh ok thanks.

Any suggestions on how to pulled pork and or ribs without smoking them ?
Unless you have a sous vide circulator I'm not the man to talk to. The last pork I threw in the oven was a total failure. Luckily for you there are a ton of people on here with a lot of experience so someone should be able to give some advice. If not just google oven rib recipes and do one that sounds good.

Edit: See? We got a helpful bunch here. captive beat me to it.
 

nin1000

Banned
Thank you all for the moral support. I will do them in the following days ( friday to be exact ) and will follow up with pictures. Please keep the suggestions and or recipies coming.

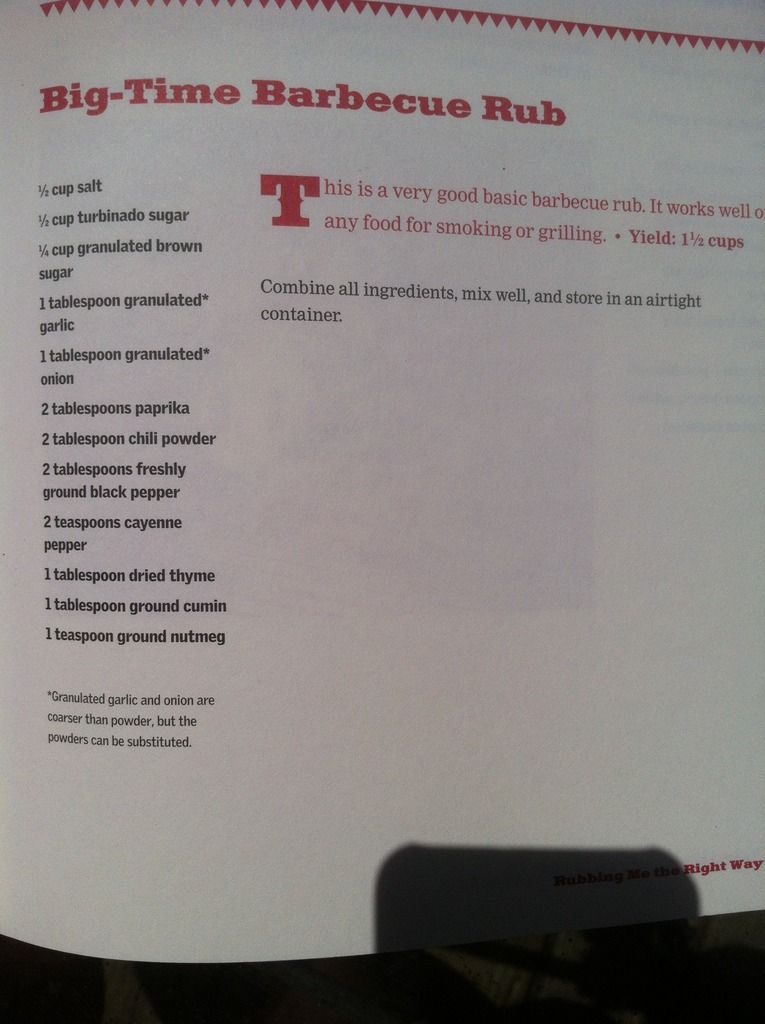
Any good ones for a Rub ? Since i am in germany it is harder to find pre made rubs in the local supermarket.
 

captive

Joe Six-Pack: posting for the common man
Thank you all for the moral support. I will do them in the following days ( friday to be exact ) and will follow up with pictures. Please keep the suggestions and or recipies coming.

Any good ones for a Rub ? Since i am in germany it is harder to find pre made rubs in the local supermarket.
I use this guys pulled pork recipe.

http://www.biggreenjoe.com/big-green-egg-pulled-pork-kansas-city-style/


the rub he uses is here.
http://bbq.about.com/od/rubrecipes/r/bl91211a.htm

1/2 cup/120 mL brown sugar
1/4 cup/60 mL paprika
1 tablespoon/15 mL black pepper
1 tablespoon/15 mL salt
1 tablespoon/15 mL chili powder
1 tablespoon/15 mL garlic powder
1 tablespoon/15 mL onion powder
1 teaspoon/5 mL cayenne


recently though i've been using this rub on chicken and pork, its simply fantastic.


.
 

Applesauce

Boom! Bitch-slapped!
I'm working on modifying my 22.5" weber kettle into a high temp pizza oven using the bottom of a 55 gallon metal drum, the width of the base (and top) is exactly the width of the kettle. The lid fits perfectly on top of the ring too. I'm taking this back to work tomorrow to finish making it for the pizza oven but this would make for a nice vertical extension to use for BBQ. Cleats would need to be added somehow to the base to keep it from sliding, but that is easy to do, and perhaps some kind of seal to keep heat from leaking (if that were an issue) - also an easy fix.


zbarron

Member
I'm working on modifying my 22.5" weber kettle into a high temp pizza oven using the bottom of a 55 gallon metal drum, the width of the base (and top) is exactly the width of the kettle. The lid fits perfectly on top of the ring too. I'm taking this back to work tomorrow to finish making it for the pizza oven but this would make for a nice vertical extension to use for BBQ. Cleats would need to be added somehow to the base to keep it from sliding, but that is easy to do, and perhaps some kind of seal to keep heat from leaking (if that were an issue) - also an easy fix.

How would adding height help the pizza? You already get a good amount of heat on the bottom of the pizza. The problem is how much faster the bottom cooks compared to the top..
 

Applesauce

Boom! Bitch-slapped!
How would adding height help the pizza? You already get a good amount of heat on the bottom of the pizza. The problem is how much faster the bottom cooks compared to the top..

This is a DIY version of the Pizza Kettle mod, without the ridiculous price tag. I'll post a couple of pics when I'm done but the goal is to mimic the environment of a wood-fired brick oven with temps in excess of 600F, ideally around 800-900F. The ring extension with a door cut in lets you put the pizzas in without removing the lid, keeping the temp very high. If you dump all the coals under the baking stone you will end up with a burnt bottom crust and undercooked top. Search for Pizza Kettle on YT
 

zbarron

Member
This is a DIY version of the Pizza Kettle mod, without the ridiculous price tag. I'll post a couple of pics when I'm done but the goal is to mimic the environment of a wood-fired brick oven with temps in excess of 600F, ideally around 800-900F. The ring extension with a door cut in lets you put the pizzas in without removing the lid, keeping the temp very high. If you dump all the coals under the baking stone you will end up with a burnt bottom crust and undercooked top. Search for Pizza Kettle on YT
I'm familiar with it. I was considering getting one once upon a time. Amazing Ribs rated the top of the line "Serious Eats Kettle Pizza" edition as "Not Recommended" Kenji reviewed the original and was not impressed, the newer shorter version was better but he still "hacked" it to get it working the way he wanted.

What are you planning to do with the drum besides cutting out the door?
 

Applesauce

Boom! Bitch-slapped!
I'm familiar with it. I was considering getting one once upon a time. Amazing Ribs rated the top of the line "Serious Eats Kettle Pizza" edition as "Not Recommended" Kenji reviewed the original and was not impressed, the newer shorter version was better but he still "hacked" it to get it working the way he wanted.

What are you planning to do with the drum besides cutting out the door?

It is definitely not worth $430 that's for sure, which is why I'm making my own for free :)

However it does indeed work, so I'd take that amazing ribs review with a grain of salt. I've seen people get 800F easily with it or a similar set up. This is the actual serious eats review of the newer kit. But it can easily be replicated with a much cheaper set up. $430 is fucking ridiculous! Home Depot has something similar for a fraction of the price.

The only thing I have left to do is cut the door, put a plate in over the top of it, and paint it.
 

zbarron

Member
It is definitely not worth $430 that's for sure, which is why I'm making my own for free :)

However it does indeed work, so I'd take that amazing ribs review with a grain of salt. I've seen people get 800F easily with it or a similar set up. This is the actual serious eats review of the newer kit. But it can easily be replicated with a much cheaper set up. $430 is fucking ridiculous! Home Depot has something similar for a fraction of the price.

The only thing I have left to do is cut the door, put a plate in over the top of it, and paint it.
OK so you are putting a plate over the top. That was my concern. What material are you using?
 

Paskil

Member
Got a whole brisket at Costco. It was back down to $2.69/pound for prime. Picked up a thermapen yesterday and am ready to go, this weekend. Hoping for my best brisket yet.
 

phanphare

Banned
This is a DIY version of the Pizza Kettle mod, without the ridiculous price tag. I'll post a couple of pics when I'm done but the goal is to mimic the environment of a wood-fired brick oven with temps in excess of 600F, ideally around 800-900F. The ring extension with a door cut in lets you put the pizzas in without removing the lid, keeping the temp very high. If you dump all the coals under the baking stone you will end up with a burnt bottom crust and undercooked top. Search for Pizza Kettle on YT

yeah that looks awesome, might be a summer project for me
 
I'm honestly surprised there isn't more talk of making a heatermeter in here (search only showed 2 results unless I'm bad at gaf-search-fu).

I've used mine so much that I ended up replacing the old Maverick probes with Thermoworks ones for multiple meats and multiple test points. It certainly makes watching the brisket easier, considering I tend to do mine with a hot and fast instead of a low and slow cook.
 

Applesauce

Boom! Bitch-slapped!
OK so you are putting a plate over the top. That was my concern. What material are you using?

1/4" thick steel plate we have laying around at work. I thought about using the top that we cut out of the barrel but the steel plate retains heat much better, and can also be used as a griddle. If we get some time later today we'll finish all that and paint it on monday.
 

zbarron

Member
1/4" thick steel plate we have laying around at work. I thought about using the top that we cut out of the barrel but the steel plate retains heat much better, and can also be used as a griddle. If we get some time later today we'll finish all that and paint it on monday.

Very nice. 1/4" steel will have a ton of thermal mass.That's essentially a baking steel. Sorry for underestimating you haha. I thought you were just going to cut out a door and put the Weber lid on top from your first post.
 

Eilt

Neo Member
Quick question for Pork Butt

Remove the fat cap? All, some, none? Cap (or left of it) up or down?

Thanks in advance

Depends on what you are looking for, leaving it on and cooking fat side down gives you room for error with temperature spikes and provides a cooking surface you can trim off later.

Fat side up provides some fat drippings but it won't actually absorb into the meat so is not needed.

As pork butt is pretty fatty already, if you are comfortable with it I would trim it and provide more surface area for the rub to actually contact the meat you will be eating.

Good luck!
Sounds good.

As this will be my first one on this grill I think I'll go for safety and leave it on
 

jchap

Member
If Americans can do something right... they know how to smoke some Brisket. I loved the stuff when I was in Atlanta last year!!

And you weren't even in Brisket country. I'm a central Texas style Brisket fan myself. Got one going on today along with a rack of ribs.
 
I've got a try-trip that I am going to smoke today or tomorrow, any tips?

For that matter I am also going to be smoke my first cured pork belly for bacon as well. Any tips on any of it, please feel free to fire away.
 

jchap

Member
I've got a try-trip that I am going to smoke today or tomorrow, any tips?

For that matter I am also going to be smoke my first cured pork belly for bacon as well. Any tips on any of it, please feel free to fire away.

Cold smoking the bacon I assume? I hear good things about the A-MAZE-N pellet smokers.
 
Quick question for Pork Butt

Remove the fat cap? All, some, none? Cap (or left of it) up or down?

Thanks in advance

I kind of go against the norm and I leave the fat cap on, and cook it fat up. I also take my pork butts to an internal of 205 and when I pull it 90 something percent of the fat cap has melted and I just leave it on as I pull the rest of the butt. I get it all mixed in and really makes for some juicy pulled pork. Not the healthiest, but damn does it taste good.
 
For that matter I am also going to be smoke my first cured pork belly for bacon as well. Any tips on any of it, please feel free to fire away.

Cold smoke it (I have an a-maze-n smoker for this and they work awesomely), and do so a couple of times. What I learned from a butcher who made his own amazing bacon, was to cold smoke it for 6 hours on Day 1 and Day 2, let it rest in the fridge on Day 3, and then hit with like another 6 hours of smoke on Day 4.

I personally then freeze it and throw it on a slicer the next day to get really good sliced rashers.

I don't have any newer pics but this is from when I was just cold smoking it once for 8 hours.

13891499473_e658350f04_h.jpg
 
I'm doing STL style ribs today. Got so much extra meat with this batch I pretty much used every inch of space in my 22" kettle.

2 hours in:

Y9PITc6.png
 

zbarron

Member
I'm doing STL style ribs today. Got so much extra meat with this batch I pretty much used every inch of space in my 22" kettle.

2 hours in:
Looking good. I am so impatient to receive my Slow N Sear.

As promised:

Ribs:
27303722756_6ab092b222_b.jpg


Rib Temperature:
27061826360_b88838d938_b.jpg


Weber Temperature:
27303703256_abf70b7c02_b.jpg


I'm new to graphing so not sure why there are holes in the graph. This was my first time using a thermometer inside the ribs. Interestingly I didn't notice a stall at all. I had the tip in a meaty portion between two bones. Once that hit 190 i moved the probe to another area and it read lower so I continued cooking them for a bit,

With the Weber graph it is obvious where I opened the lid. The first time I needed to move the smoke wood closer to the lit part of the fuse so my first hour wasn't smoke free. Every opening after that was to rotate the grill to keep the ribs away from the direct heat and to refill the water. It held very constant at about 230*F which is hopefully visible with the graph.
 

mcfrank

Member
Looking good. I am so impatient to receive my Slow N Sear.

As promised:

Ribs:
27303722756_6ab092b222_b.jpg


Rib Temperature:
27061826360_b88838d938_b.jpg


Weber Temperature:
27303703256_abf70b7c02_b.jpg


I'm new to graphing so not sure why there are holes in the graph. This was my first time using a thermometer inside the ribs. Interestingly I didn't notice a stall at all. I had the tip in a meaty portion between two bones. Once that hit 190 i moved the probe to another area and it read lower so I continued cooking them for a bit,

With the Weber graph it is obvious where I opened the lid. The first time I needed to move the smoke wood closer to the lit part of the fuse so my first hour wasn't smoke free. Every opening after that was to rotate the grill to keep the ribs away from the direct heat and to refill the water. It held very constant at about 230*F which is hopefully visible with the graph.

If my iPad goes out of range of the Bluetooth then I get holes in my graphs. Not sure if that is your setup but that happens on mine.
 
Been thinking about giving brisket another try now that I am more comfortable with the smoker. Problem is I don't want to feel stuck home all day so I'm thinking of going over night. Presumably get it on around 7 or 8 and let it go all night at 220-250.

Anyone got tips for an overnight?


Quick question for Pork Butt

Remove the fat cap? All, some, none? Cap (or left of it) up or down?

Thanks in advance

Leave it. So much of it will render out while cooking
 
Been thinking about giving brisket another try now that I am more comfortable with the smoker. Problem is I don't want to feel stuck home all day so I'm thinking of going over night. Presumably get it on around 7 or 8 and let it go all night at 220-250.

Anyone got tips for an overnight?

What kind of smoker? You could always look into a temp control system such as:
https://bbqguru.com/storenav?CategoryId=1

Otherwise, buy a Maverick ET-732 (or newer model) so you can monitor temps and get alerts if the temp drops or goes too high.
 
Weber smokey mountain. I already have a maverick and have done a bunch of smokes (lots of cured belly, chicken, and a few butts). I only tried brisket once and it was the high heat method which I ended up pulling off way too early.

The only other thing I was thinking of doing was smoking to 160, wrap and then into the oven for the remainder.
 

snacknuts

we all knew her
So I took my first crack at pizza on the grill the other night. I kind of rushed things and it was sub-optimal, but it was still very good.


In the course of trying to learn how to do this, I found something called a KettlePizza kit that turns your Weber into a very nice approximation of a proper wood-fired pizza oven. I can't imagine actually buying one, but I'll be dipped if I don't find myself seriously coveting one.

npCpFKk.jpg
 
Anyone here from Canada?

Quick question, how do the wood chips from Canadian tire stack up? I usually buy the weber smoking chips off amazon canada but im seeing some nice deals elsewhere too
 

zbarron

Member
So I took my first crack at pizza on the grill the other night. I kind of rushed things and it was sub-optimal, but it was still very good.


In the course of trying to learn how to do this, I found something called a KettlePizza kit that turns your Weber into a very nice approximation of a proper wood-fired pizza oven. I can't imagine actually buying one, but I'll be dipped if I don't find myself seriously coveting one.
I was planning on grilling pizza last night but my dough was being an unruly asshole so I chucked it and we had leftovers.

If you look further up the page Applesauce and I were discussing the KettlePizza.
Anyone here from Canada?

Quick question, how do the wood chips from Canadian tire stack up? I usually buy the weber smoking chips off amazon canada but im seeing some nice deals elsewhere too
I'm not from Canada but I'm wondering why you're using chips instead of chunks.
 

zbarron

Member
No reason other than that's mostly what I find in store.... Are chunks better? I haven't done a long smoke so I figured chips would be the way to go
I prefer chunks for smoking and I think most do too. I've never had much luck smoking with chips. Without soaking them they burn up in seconds and I can't have all of them touching since they'd light each other and all be gone within a few minutes. When soaked they leave the coal wet which makes it harder to light.

With chunks I don't have to worry about that and I get thin blue smoke and great flavor. I've been cutting my own chunks out of split wood from a tree that was in the back yard with a miter saw but a stabilizing screw fell out of it and now when I use it the blade is far from stable. Until I fix it I might buy a bag of chunks. Saving a bit of money is not worth losing a finger.
 

snacknuts

we all knew her
I was planning on grilling pizza last night but my dough was being an unruly asshole so I chucked it and we had leftovers.

If you look further up the page Applesauce and I were discussing the KettlePizza.

D'oh! My mistake. That cheaper alternative from Home Depot looks compelling, but I've been doing a lot of reading about these things today and I think it will still suffer from the same problem the original KettlePizza had of letting the heat get too far above the pizza. I might have to pick one up and mod it.
 

zbarron

Member
D'oh! My mistake. That cheaper alternative from Home Depot looks compelling, but I've been doing a lot of reading about these things today and I think it will still suffer from the same problem the original KettlePizza had of letting the heat get too far above the pizza. I might have to pick one up and mod it.

I agree it's tempting at that price. The simplest mod is just creating a "roof" by covering the top of the device with HD aluminum foil to reduce the air space above the pizza. It seems to produce decent but not perfect results. I figured I'd try dough straight on the racks with flipping it before messing with the add-ons.
 

Applesauce

Boom! Bitch-slapped!
D'oh! My mistake. That cheaper alternative from Home Depot looks compelling, but I've been doing a lot of reading about these things today and I think it will still suffer from the same problem the original KettlePizza had of letting the heat get too far above the pizza. I might have to pick one up and mod it.

I wouldn't bother with the base kit, since there is no radiant heat or convection current directly above the pizza. And the deluxe kit with the plate on top ... $430, lol no. You can get a Roccbox for about 100 bucks more. I'm still working on the DIY kettle pizza, hope to have it done by the weekend so I can test it out before painting it.
 
I prefer chunks for smoking and I think most do too. I've never had much luck smoking with chips. Without soaking them they burn up in seconds and I can't have all of them touching since they'd light each other and all be gone within a few minutes. When soaked they leave the coal wet which makes it harder to light.

With chunks I don't have to worry about that and I get thin blue smoke and great flavor. I've been cutting my own chunks out of split wood from a tree that was in the back yard with a miter saw but a stabilizing screw fell out of it and now when I use it the blade is far from stable. Until I fix it I might buy a bag of chunks. Saving a bit of money is not worth losing a finger.

Ohhhh thanks for the insight, yeah I always soak my chips but no longer...chunky it is
 

ColdPizza

Banned
Well, we've previously discussed the new Weber Summit Charcoal grill and we all came to the conclusion it was overpriced, but I've been doing some more research on it and it at least has recouped another 400-600 in value in my opinion based off the following videos.

1. This guy does a smoker efficiency test. He filled the charcoal basket completely full and used a fan system (Weber offers a port on the bottom of the grill for this express purpose) and the guy got an impressive 50 hours cooking time keeping temps between 225-250. That was without food, but even then, he could probably still get 25-30 hours out of it.

https://www.youtube.com/watch?v=l88zDqQdLKU

2. This guy compares the summit vs the bge...there's definitely some build advantages to the summit verse the bge.

https://www.youtube.com/watch?v=5GdhgQhEMBk

disclosure: no, i don't work for weber
 

Paskil

Member
Made a brisket over the weekend. I was in Chicago last weekend and I keep forgetting to order a thermapen. Went to a BBQ shop (pretty great store) and paid the website retail price, which was nice not to see insane markup. Backyard BBQ Store if you're ever in the area. Got the Classic Thermapen and it seems really great, so far.

This was a pretty fat brisket and was my longest smoke, clocking in at about 26 hours. I separated the flat, wrapped it in foil and towel and coolered it for three additional hours. Cubed the point, poured all the delicious liquid gold in the pan with the cubes, seasoned them up with some more pepper and a few other spices and put them back in for two more hours of heat and smoke. I think this was my best brisket yet. Used cherry.


Kind of blurry, apologies.


zbarron

Member
Well, we've previously discussed the new Weber Summit Charcoal grill and we all came to the conclusion it was overpriced, but I've been doing some more research on it and it at least has recouped another 400-600 in value in my opinion based off the following videos.

1. This guy does a smoker efficiency test. He filled the charcoal basket completely full and used a fan system (Weber offers a port on the bottom of the grill for this express purpose) and the guy got an impressive 50 hours cooking time keeping temps between 225-250. That was without food, but even then, he could probably still get 25-30 hours out of it.

https://www.youtube.com/watch?v=l88zDqQdLKU

2. This guy compares the summit vs the bge...there's definitely some build advantages to the summit verse the bge.

https://www.youtube.com/watch?v=5GdhgQhEMBk

disclosure: no, i don't work for weber
Very good points and that is impressive. It's price seems a lot more fair when compared to a big green egg but there is no way in hell I could ever afford or justify $1,500 on a grill. I'd rather have my $100 grill with a $100 Slow N Sear and use the remaining $1,300 on prime grade brisket. More power to anyone who can afford it, but not for me and it probably never will be.

Welcome back by the way. Smoke anything recently?

Edit:That looks fantastic Paskil. I only use milder woods. Did it hold up against the brisket?
 

ColdPizza

Banned
Very good points and that is impressive. It's price seems a lot more fair when compared to a big green egg but there is no way in hell I could ever afford or justify $1,500 on a grill. I'd rather have my $100 grill with a $100 Slow N Sear and use the remaining $1,300 on prime grade brisket. More power to anyone who can afford it, but not for me and it probably never will be.

Welcome back by the way. Smoke anything recently?

Thanks, just a pork shoulder that I wasn't too impressed with. Tried a new rub of my own concoction and I just wasn't impressed. Some thoughts.

1. I really need to get back to rubbing my meats 24 hours in advance again (then a light dusting again just before putting on the smoker). I seriously believe it helps with smoke penetration, tenderizing, and crust formation.

2. I should probably just stick to cookbook rubs. They're popular for a reason.

I have some smoking plans this summer.

1. Asian styled smoked ribs. Need to find a good asian style spice rub, and I'm looking for plum wood chunks.

2. Going to get some boneless 3lb pork butts and give them a citrus marinade. I'm getting a little tired of just pulled pork sandwiches so I'm leaning towards making some Mexican taco inspired shredded pork to eat in tortillas.

3. I still want to smoke my own pastrami.
 
Top Bottom