Ultimadrago
Member
Someone fix the Einbroch. It's broken again
Not sure if this Atelier Totori figure is sought after but:
(Pre-owned ITEM:A/BOX:B)Atelier Totori: The Adventurer of Arland - Totori 1/8 Complete Figure(Released)
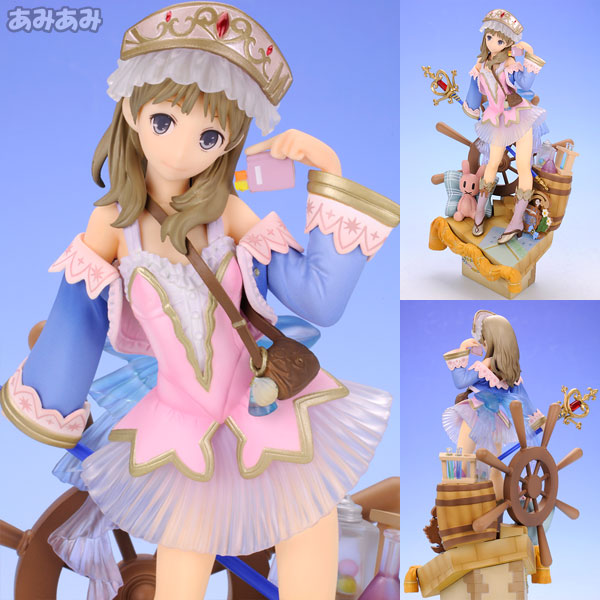
7,780 JPY
I'M FIXED FOR THE FIRST TIMESomeone fix the Einbroch. It's broken again
Never played the game, but she is cute.
I'M FIXED FOR THE FIRST TIME
im in love
XD
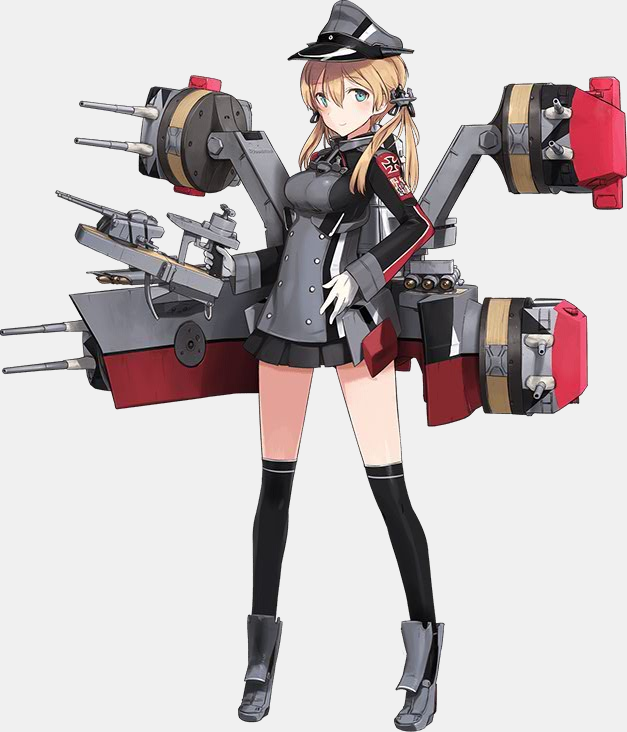
Does this lovely lady have a name?
Hm. So can ship girls catch Abyssal? Like an STD?
More like being cured. Nawmean?
The page makes me chuckle a little, as it also includes Amiami's failed endeavour of their amiamivideo where it seems they even abandoned the channel XDNever played the game, but she is cute.
Hm. So can ship girls catch Abyssal? Like an STD?
Do you guys think there's an Abyssal Admiral somewhere?

The page makes me chuckle a little, as it also includes Amiami's failed endeavour of their amiamivideo where it seems they even abandoned the channel XD
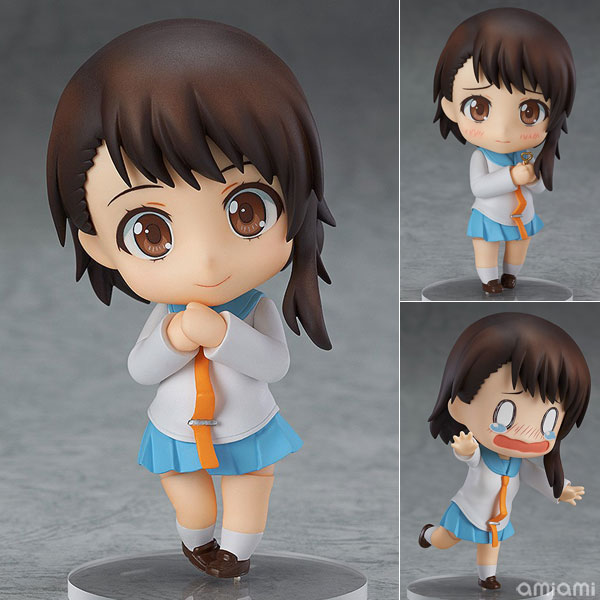
Kinda expted this adorable Onodera Nendo to get a delay but she is in the order now as well

Isn't there some scuttlebutt about how Abyssal Girls are supposed to represent the west?
She's releasing on the 12th. I really want one
Don't think I'm gonna go for that Samurai, brehs. Maybe if I hadn't impulse bought that Max Factory Mugi yesterday.
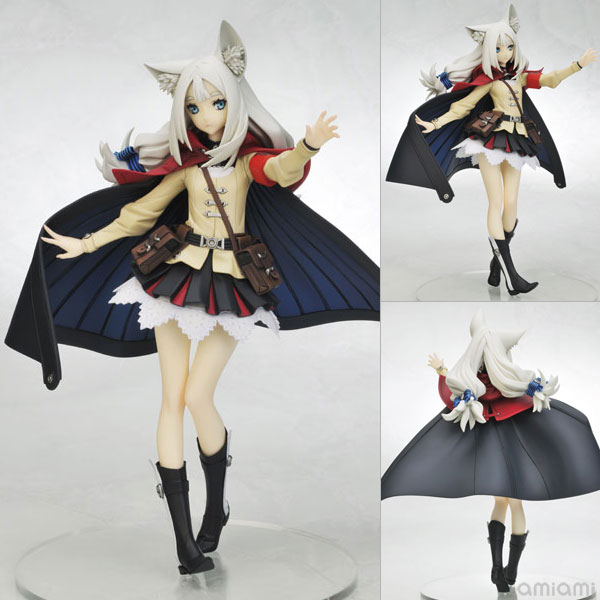
Are any of you guys gonna grab the new 7th Dragon figure?
She's a cutie, but she's a bit pricey at 12k. And no fluffy tail? WAT?
Do you guys think there's an Abyssal Admiral somewhere?
This just makes it all the better.
Thank you, darkblade, thank you for bringing this into my life.
:O
Who is this cutie I see before me?
Do you guys think there's an Abyssal Admiral somewhere?
Are any of you guys gonna grab the new 7th Dragon figure?
She's a cutie, but she's a bit pricey at 12k. And no fluffy tail? WAT?
I heard the position was open, I've already submitted my credentials.
To each his own. At least you're not turning down an Abyssal girl. If you did that, well, I don't know if you'd be welcome here anymore.
You'd have to send your abyssal girls into battle. Is this something you're willing to do?
...This is the KanColle OT, isn't it.
I don't even like the pretty boat girls. Why would I want the ugly ones?

I thought I had read that they were planning to expand the game to include western fleet girls, which would dispel this myth. However the only thing I can actually find right now is the recent addition of the german Hipper-Class.
...This is the KanColle OT, isn't it.

Here's a picture of Samus here. She's got a cool pose, but I dunno, just not feeling this photo. Looks kind of like a drive by photo. I mean sure there's Samus, but look at all this other stuff. It's removing focus and weakening the photo.
BUT, crop out your left and right a bit, and it's a good showcase photo. It's your, "Hey look what I got today" photo. In fact, here's one of those.

Aw yeah, here we go. "Guys, check out Samus." That's what this photo is. It gives the view a good look at the front. This is when you're showing off your new toy, not really doing anything fancy about it. Unlike me, you should dust it first.
But, I want a better photo. I want one that looks cool, that I wouldn't mind printing out and putting on a wall. How do I do that?
That's when the rule of thrids and all that other stuff comes in. Compare the photos you just saw with this one.

Hot damn. This photo has focus. No one's gonna walk by and get distracted by ZSS's sexy long legs unless they take a real good look at it. It's more dynamic, more focused, and less boring. This is less a photo of a model of Samus, and closer to a photo where Samus is a model, if that makes sense.
Another important thing to note is what direction your subject is looking in, in relation to their position on the frame. Let's take our next model Mario.

Sweet. Pretty nice picture. He's grabbing a coin, he's smiling like a goofball, and I don't see his damn feet. But I wouldn't really call this a good photo. Why? He's in the middle.
Having him in the middle like that can sort of give it a "cramped" kind of feeling. Don't ask me why it does that, it's just some weird ass thing our brain thinks. Take it up with your nervous system, Iunno. So how do we fix that? We move him to the side. "Well duh Hex you already told me that, that's the rule of thirds". Okay, true, but I didn't say which side now, did I?
Take the grid for the thirds thing.

We have these intersections, and a lot of times you want to put your subject in one of them. But which one, when?
For many basic photos, you will want your subject to be in the upper intersection, on the side they are facing away from. Essentially, you want them looking more towards the center of the photo, at least horizontally. Up or down, who cares. But having them facing that "open space" of the photo, helps create the impression of space. Conversely, having them face towards the side they are closest to will create a feeling of closedness. However, this can also be used to create the impression of them "leaving" the photo.
Now let's try a very similar, but different photo of Mario.

Wow that's immediately better. It's hard to explain why, but your eye is more drawn to these corners than it is the actual center of the image. The rest (facing left or right) is based on that fact.
As far as whether you want the subject to be on the upper or lower intersections, that's entirely up to you -- but if they are on the lower intersection, it creates a feeling of there being a lot of verticality; great for epic landscapes or having that "peeking" feeling.
The most important thing to know about composition and framing, is that there is no 100% right answer. You can break every single rule or guideline I just gave you . As long as you know why you did it. Different framing and composition will create many numerous types of feelings, impressions, and focuses. Whenever you take a photo, make sure you take at least two when you can. Try and vary up the framing a bit, and see what works. There are many photos where a dead center subject works great, just always be thinking about "How does this position, affect the impression it gives".
And that's all for basic composition!
The Camera.

Why hello there, my beautiful a6000 that I totally did not settle on instead of an a7! What you see before you is known as a Mirrorless interchangeable camera. To explain to you what that means, I'll have to tell you what a DSLR is. A DSLR is a fancy name for a camera that uses a mirror to reflect an image into the viewfinder, and when actually taking a photo pulls that mirror out of the way, to expose the sensor to the actual image. The sensor is what does all the hard work, and is about 50% of what makes a DSLR take great photos. The mirror is there just to project the image to your eyeball so you know what you're taking a picture of. A Mirrorless Interchangeable Camera is almost the exact same thing. The only difference, is that instead of using a mirror to show you what your camera sees, it just uses the sensor itself. This carries with it a few advantages.
1: Instead of an optical viewfinder (ie, a mirror) you use either an LCD attached to the body of the camera, OR even a digital viewfinder. Some will disagree with me, and that's fine, but a digital viewfinder has the advantage of showing you more accurately the photo you are about to take. Assuming your settings dictate such, all the effects of ISO, Exposure, and Aperture are immediately visible before taking the photo. IMO, I love this, but some prefer the look of a mirror.
2: It's fucking tiny. You get the exact same sensor (Well, basically the same), in a MUCH smaller frame. That means lighter and more pocketable. That means taking it more places. That means getting more for your money. Speaking of which
3: It's just cheaper. Mirrors are expensive. Or something. Iunno, but 90% of the time a Mirrorless camera will be cheaper than a DSLR.
This isn't to say a DSLR just outright loses to a mirrorless, but they're more for the pros. They have some nicer grips, more buttons for more settings, and I'll admit a mirror does have some niceties about it (namely, a bit less dust to worry about on the sensor). But for people who aren't after those things, and are just looking for "bang for buck" image quality, a Mirrorless is the way to go.
Pick whatever you like, but NeoGAF has the Camera Equipment Megathread to ask more about what to get.
The Lens

You know when I said that the sensor makes up 50% of a DSLR's photo taking capabilities? Well the lenses make up 60%. Fuck math, IDGAF. It's a 60/50 split. "But Hex, LENSES ARE FUCKING EXPENSIVE". All I have to say is "HOLY HELL YES THEY ARE!"
Or are they?
While popping out a brand new, power zoom or even Prime lens will cost you about $300 right off the bat, who ever said you need a brand new, power zoom lens? For fractions of the cost of getting a new one, you can take a step through time and pick up a vintage, all manual lens with a cheap $30 adapter for your camera. "But Hex, doesn't that mean that I won't be able to use most if any of the automatic functions on my camera?" Yeah, that may be true But essentially, those automatic function cost you an extra $200 or more per lens. Once I realized that, my decision was easy as hell. And old lenses, optically, are equal or even superior to modern, native lenses. My second best lens, the most versatile one that I have, was the one my mom got with her camera for a graduation gift. That was 30 years ago. It totally shits on the modern lens that my camera came with.
So what lenses to get? Good question! Ultimately, there's a variety of factors, but unless you got a Full Frame camera (if you don't know what that means, you didn't get a full frame camera), the best starting points would be a 35mm, a 50mm, and one 100+mm lens.
"Wait what the hell does any of that even mean?" The long and short of it, is that the focal length (the 35mm, 50mm part) determines the "zoom", or field of view of that lens. You know how point and shoots typically have weird "10x" or "30x" zooms? That's done by changing its focal length from, say, 35mm, to 100mm. A shorter lens (like 35mm) will let you take a photo that has more to its left and right, where as a longer lens (400mm) will have your neighbor's nosehair take up half the photo (give or take).
"But Hex, why not just get a zoom lens? Why would I get 3 different lenses that 1 lens could cover?" Because that zoom lens, unless it's really expensive, will not only be heavier, but also take worse photos. To have that adjustability, there are sacrifices, and this is something that will affect the picture you have at the end of it all. Also, it helps to force you to plan out your composition, and to understand what focal lengths are good for what photos. Having an adjustable zoom lens just lets you zombie your way through both of those things, which only hurts you and your photos. Like earlier, see the NeoGAF camera equipment megathread for ideas on what lenses to get for what situations.
TRIPOD. You want a tripod. If you're just starting out, just get some cheapo $40 one. It'll make you appreciate your next tripod that much more, but definitely get a tripod. ESPECIALLY for figure photography. More on that later.
FLASH. This is where stuff gets tricky, especially if you go for one that's manual, ie does not have TTL. TTL is a fancy word for "auto flash". I'll get into this more later.
When you're all said and done, you can end up with this monstrosity!

I swear there's a camera under all that.
Aperture. This is the most complicated, IMO, of the holy trinity of light. Aperture is what defines how much light is let through the lens at one instant. To liken it to a water hose, it's how much water you are letting flow. Wide open aperture? The hose is at full blast! Tight pinhole aperture? The hose is just barely trickling water. The wider and bigger your lens is opened up, the more light is going to come in, and the brighter your photo will be. The metric for this is kind of tricky; it's measured by your "F Stop" number, which you can find go anywhere from 1.8 all the way to 22, but the number means the opposite of what you'd think. The smaller the number, the bigger and wider the opening is. So F1.8 lets in a WHOLE LOT of light, whereas an F22 lets in a small pinprick of light. Weird, but you'll get it straight in your head pretty quick.
Remember how I said that all three settings in the holy trinity have side effects? Here's where I start talking about that.
The more light you let in (wider aperture, smaller F number), the exaggerated the out of focus effect will be.
Example photo time!

This photo was taken at F22. So super tiny hole, not a lot of light getting through. Notice how you can pretty readily tell what's in the background behind? Now let's take a look at the next photo:

This photo was taken at F1.8 (So SUUUUPER wide open, lots of light getting through). Samus's face is still razor sharp, but the background behind her is blurry now, almost unintelligible, and that's only a few feet behind her. The more light I let in, the blurrier things get when out of focus. But this isn't a bad thing -- in fact many people buy lenses that can open up really wide, specifically to get this effect. Having that blurred background actually helps to give the subject a lot of focus, without being just complete blank space.
So in review, a chart:
F1.8 --- Super Open --- Super Bright --- Blurry background
F22 --- Nearly closed -- Darker --- Almost everything in focus
Adjusting aperture as needed is the first step towards better, brighter photos.
That's it for aperture! Let that sink in, because that's the hardest part of the Holy Trinity of Light.
Next up, exposure!
Exposure. Exposure is actually really simple; it's simply how long the light gets to hit your sensor. To go back to the hose thing, it's simply how long the hose is running. If you can't let your Aperture get really wide open, or if fully open just isn't enough light and your photos are still dark, you can adjust exposure to let more light hit your sensor. The longer your exposure time, the brighter the photo. It's that easy.
"Still waiting for the side effect, because I know it's coming"
True! But for figure photography, exposure's side effect is almost completely negligible. Because the only thing a long exposure will do to affect your photo, is introduce motion blur. Let's say that you are taking a picture of someone giving a speech, and they are moving their hands about. It's a little dark, so you decide to crank up the exposure. What this does, is the time that the shutter goes from open, to closed, is increased. And in between it opening and it closing, the speaker has moved his hands about a foot! So when you look at your photo later, you'll see a blur going from where his hand started, to where it ended. Example photo time! This time, just to exxagerate the effect, I spun slowly in my chair and took a photo of the resident cutey Dark Magician Girl.

At least I kinda think that's her Just a big blurry mess as far as I can tell! After I took that, I changed none of my settings, and only tried to hold the camera still, and got this photo:

See what a huge difference the movement created?

What this also means is that for longer exposure to be useful, the camera absolutely must be steady. This is what tripods are for. Get em, use em, love em.
Wanna know the cool part about figure photography? Your exposure is almost completely irrelevant. Figures don't move. At least, well, they shouldn't. So with a tripod and a long exposure, you can take some very clear photos, in near darkness. Example!

This used nothing but my monitor's light. I shut everything else in the room off. And you know what? I really like this one. I'm gonna LightRoom it and keep it. Thank you GAF, for making me take this nice sample photo. I'd show you the "before" picture, before I made it long exposure, but it's literally just a 1080p black square.
Now that you understand exposure, let's move on to the easiest part of this.
ISO. Ah, ISO. It's one of those necessary evils. This is one of those things that makes a potato, well, a potato. When it's really dark, you don't have a flash, and your exposure and aperture settings just don't cut it, that's where ISO comes in. ISO is basically just the "sensitivity" of the sensor. Higher ISO = more sensitivity = brighter photo. Heck sounds awesome! But there's a huge catch: ISO introduces a lot of noise into your photos. A well exposed photo at 100ISO will look leagues better than a photo taken at 6400ISO. See the samples:

Look at that potato. Okay, it's not as bad as a potato (it's hard to get my camera that bad lawl), but it's very fuzzy, some detail is lost, and it's just very noisy. Now for 100ISO:
As you can see, this is a much better shot, and the main thing I changed was the ISO and exposure. ISO just introduces noise.
However! At lower ISO ranges (say 100 to 800), the noise can be negligible. You won't do any super clear crops at 800 ISO, but taking a photo and mastering it at 1080p can give some very nice results even as high as 1600 sometimes. ISO is the only setting I ever let be set to auto, particularly since you can usually give your camera a maximum ISO (So it never goes higher than, say, 1600). It's just one less thing to worry about when I'm trying to keep my exposure times down, and 800 isn't ISO ruining. Some people even like the "film grain" like appearance in some photos.
It's important to always remember that the Holy Trinity of Light is a balance -- never have just "one setting" for any part of it. Always experiment!
*Posts GIF for KanColle/Boat girl GAF of when their ship waifus/girls got destroyed*

=P
Looks at H2XAntiStyle post, man it's like my university's beginners class photography all over again XD, hmmmmm gonna bookmark it so if anyone ever ask about taking photos of figures can see it.
One day when I have my own camera I'll re-read it. thanks & bookmarked lol*snip*
One day when I have my own camera I'll re-read it. thanks & bookmarked lol
snip
")
Hello there, and welcome to H3XAntiStyle's basic guide to basic photography!
*amazing*
Hello there, and welcome to H3XAntiStyle's basic guide to basic photography!
edit: lrn2closetags
Hello there, and welcome to H3XAntiStyle's basic guide to basic photography!
My Sol Badguy figures arrived :3


I just want to pop in and say, it's the Rule of thirds, not Rule of 3/4ths. If you start saying that to people, they're going look at you like you're crazy.
I hope this all helps out some folks get into the photography game. Taking photos of my figures is one of my favorite parts of the hobby!
WHAT!? WHEN DID HE RELEASE!?
How much are you willing to pay? N-Y has the non-limited version and that:
$45?!I posted some crappy pics of the Mega Pikachu Ys earlier in the year.
I actually use the keychain.
It's hard to stuff my keys in my pants, but oh well.
Of course I preordered these from Sunnyshore the instant they went up.
Got them all for like $45 total.
Incoming Rytlock Revenant plush.It not Rytlock, it Charrlie.
That pikachu plush is cute.
Being cute is one way to fool one's prey!Oh my goodness, Pikachu IS evil. He killed a Charizard and is now wearing its skin. :O
The guide looks fantastic. I read over it quickly, and I'm pretty excited to go home and give it a better look and start taking a few pics.
I only have a crummy phone at the moment, but is there a specific camera you would reccomend a complete newbie? Preferably one under $500? I was actually looking at that a7 you had mentioned. I saw it being discussed after reading through the tail end of the equipment thread, and I think I know why you gave up on it... At least I know why I gave up on it.
$1,699.99